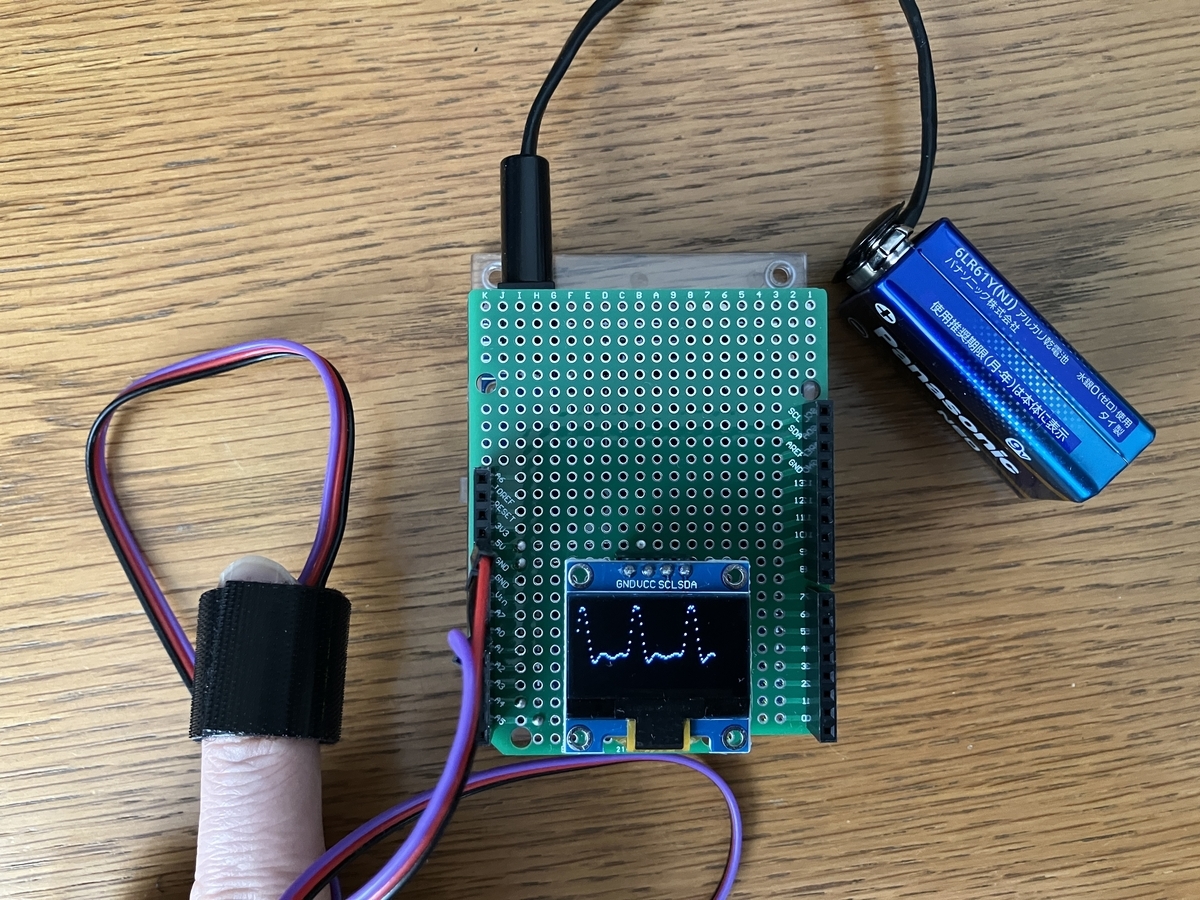
Arduino UNO R4 Minimaをベースとした心拍計を作成してみました。写真は心拍センサを指に取り付けた場合の様子です。センサを指に取り付けた直後や、指を動かしたりすると、波形が乱れますが、安定状態になるとそれっぽく波形が表示できています。

全体構成
心拍センサで心拍を計測し、Arduinoで波形に変換するとともに、心拍数を算出します。計測結果は、波形や心拍数として有機ELディスプレイに表示します。心拍センサや有機ELディスプレイは、Arduino用のシールドとしてユニバーサル基板に実装しました。
心拍センサ
World Famous Electronicsのセンサをスイッチサイエンスから購入しました。センサを指に固定するためのマジックテープや耳に固定するためのクリップも同梱されていて便利です。このセンサは販売元のホームページやGitHubに豊富な情報やサンプルコードが掲載されています。
心拍センサの信号線は、Arduinoのアナログ入力ポートであるA0ポートに接続します。
有機ELディスプレイ
有機ELディスプレイは、秋月電子通商で購入しました。この有機ELディスプレイは画素数が128x64であり、I2Cで制御します。画素数が少ないので波形の細部を描くことはできませんが、波形の概観を見るには十分でしょう。制御チップのSSD1306は広く使われているICのため、ネット上にはライブラリなどの情報も豊富です。ここではAdafruitのSSD1306ライブラリを使わせて頂きました。
プログラム
心拍センサのサンプルコードや、有機ELライブラリのサンプルコードを参考にして書いたプログラムです。BPM_INT画面分の波形を表示したのち、心拍数BPMを2秒間表示し、再び波形表示に戻ります。
/**************************************************************************
 PulseMonitor - Monitoring Heartbeat Pulse
 -Live visualization on SSD1306 based I2C OLED display.
 -Blink an LED on each Heartbeat.
 -Show BPM on OLED.
 **************************************************************************/

#include <SPI.h>
#include <Wire.h>
#include <Adafruit_GFX.h>
#include <Adafruit_SSD1306.h>

#include <PulseSensorPlayground.h>

#define SCREEN_WIDTH 128  // OLED display width, in pixels
#define SCREEN_HEIGHT 64  // OLED display height, in pixels
#define OLED_RESET -1     // Reset pin # (or -1 if sharing Arduino reset pin)
#define SCREEN_ADDRESS 0x3C // I2C address
#define BPM_INT 4         // Screen interval showing BPM
Adafruit_SSD1306 display(SCREEN_WIDTH, SCREEN_HEIGHT, &Wire, OLED_RESET);
PulseSensorPlayground pulseSensor;  // Creates an instance of the PulseSensorPlayground object called "pulseSensor"

int PulseSensorPurplePin = 0; // Pulse Sensor PURPLE WIRE connected to ANALOG PIN 0
int LED = LED_BUILTIN;        // The on-board Arduion LED
int Signal;                   // holds the incoming raw data. Signal value can range from 0-1024
int Mcount = 0;               // counts measurements
int Scount = 0;               // counts screen refreshes
int Threshold = 580;          // Determine which Signal to "count as a beat", and which to ingore.

void setup() {
  Serial.begin(115200);       // Set's up Serial Communication at certain speed.

  // Configure the PulseSensor object, by assigning our variables to it.
  pulseSensor.analogInput(PulseSensorPurplePin);
  pulseSensor.blinkOnPulse(LED);       //auto-matically blink Arduino's LED with heartbeat.
  pulseSensor.setThreshold(Threshold);

  // Double-check the "pulseSensor" object was created and "began" seeing a signal.
   if (!pulseSensor.begin()) {
    Serial.println(F("pulseSensor allocation failed"));
    for(;;); // Don't proceed, loop forever
  }

  // SSD1306_SWITCHCAPVCC = generate display voltage from 3.3V internally
  if(!display.begin(SSD1306_SWITCHCAPVCC, SCREEN_ADDRESS)) {
    Serial.println(F("SSD1306 allocation failed"));
    for(;;); // Don't proceed, loop forever
  }

  // Show initial display buffer contents on the screen --
  // the library initializes this with an Adafruit splash screen.
  display.display();
  delay(2000); // Pause for 2 sec
  display.clearDisplay();

}

void loop() {
  // Pulse Sensor
  Signal = analogRead(PulseSensorPurplePin);  // Read the PulseSensor's value.

  // draw a point on the OLED
  display.drawPixel(Mcount, (int)(SCREEN_HEIGHT-SCREEN_HEIGHT*Signal/1024), SSD1306_WHITE);
  display.display();

  // check whether reached to the screen edge
  if (Mcount++ >= SCREEN_WIDTH) {
    display.clearDisplay();
    Mcount = 0;
    if (Scount++ >= BPM_INT) { // if the screen was refreshed BPM_INT times
      Scount = 0;
      int myBPM = pulseSensor.getBeatsPerMinute();

      display.setTextSize(2);                 // draw 2X-scale text
      display.setTextColor(SSD1306_WHITE);
      display.setCursor(0,SCREEN_HEIGHT/2);   // set cursor position
      display.print(F("BPM="));
      display.println(myBPM);
      display.display();
      delay(2000);
      display.clearDisplay();
    }
  }
}